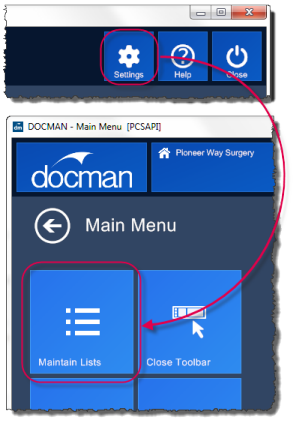
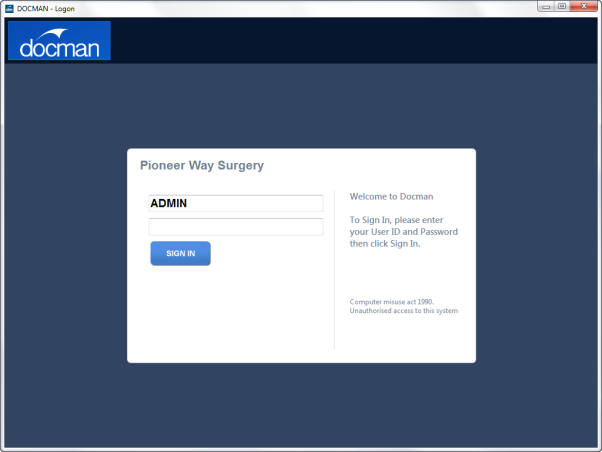
Breadcrumbs Proxy:

You are here: Workflow Maintenance > iWorkflow Maintenance Guide > Quick Steps

Topic Body Proxy:

Quick Steps

A Quick Step can be configured to consist of a series of steps linked together to provide a single-click process. Quick Steps are only available in iWorkflow. Using Quick Steps saves users from needing to add individual steps manually, therefore saving time and effort.

When creating a new quick step, we strongly recommend that the quick step is tested with test patient data before being used with live patient data. This allows the practice to confirm the workflow is routed appropriately.

Quick Steps are configured in the Maintenance section, under Quick Steps.

New quick steps are created by clicking Add.

In this example, a quick step will be created for users who have received a workflow in error and wish to return it to the sender.

The Description is the name of the quick step, which appears in the iWorkflow Activity pane. It is good practice to give the quick step a clear, concise name.

Next, steps need to be specified for the quick step to carry out. To view the list of possible steps, click Add Step.

There are twelve steps to select from:

Add CC'd User/Group

Copy the workflow to another user or group. This step can be configured to forward to a pre-defined user, or "Prompt for user" may be selected, which will present a user list when the quick step is selected.

Forward to User

Forward the workflow to another user. This step can be configured to forward to a pre-defined user, or "Prompt for user" may be selected, which will present a user list when the quick step is selected.

Get User's Opinion

Forward the workflow to another user. This allows the chosen user to add a comment, then send the workflow back to the user that requested the opinion. This step can be configured to forward to a pre-defined user, or "Prompt for user" may be selected, which will present a user list when the quick step is selected.

Add Comment

Add one of the pre-defined workflow comments.

Assign Action

Assign an action to the workflow. Note that a quick step may only contain one action.

Free Text Comment

Add a comment to the workflow.

Finish

Automatically finish the workflow and move it to the next recipient (or complete the workflow if there are no other recipients in line).

Prompt for Free Text Comment

Prompt the user to type a comment to add to the workflow.

Add Comment (Quick Step Description)

Add the quick step description to the workflow as a comment.

Return to Sender

Return the workflow to the sender.

Forward to Group

Forward the workflow to a recipient group. This step can be configured to forward to a pre-defined group, or "Prompt for group" may be selected, which will present a group list when the quick step is selected.

Change Priority

Change the priority level of the workflow. A specific priority may be chosen, or "Prompt user to choose" may be selected to prompt the user to select the new priority level when the quick step is selected.

Please Note: The steps "Finish", "Return to Sender", "Forward to User" and "Forward to Group" automatically move workflows from the user's intray.

If "Return to Sender", "Forward to User" or "Forward to Group" is selected, the workflow will move to the specified user or group. If Finish is chosen, it will move to the next user or group or finish, depending on what has been defined in the workflow.

"Get User's Opinion" also moves a workflow from the user's intray, but returns the workflow to the original user after comments have been added.

In our example, the quick step needs to:

  1. Add a comment to the workflow explaining that it was sent to the wrong user
  2. Enable the user receiving the workflow to add a comment
  3. Return the workflow to the sender

These could be configured as follows:

  1. Add Comment (Quick Step Description) - our example is Return to Sender - Wrong Recipient
  2. Free Text Comment (Prompt User)
  3. Return to Sender

Note: The second step (prompting the user to add a free text comment) is optional and may be left out of the quick step configuration, depending on the users' preferences.

Additional options are available when creating or editing a quick step.

Note: If a quick step is created for a recipient group and the user is removed from the recipient group, they will no longer have access to use the quick step.

Saving the Quick Step

Once the quick step is configured, click Save.

The quick step now appears in the Quick Step list in Workflow.

Note: There is the option to include the "Finish" step, to support the one-click philosophy of Quick Steps. The icon next to a quick step indicates whether it automatically moves the workflow to the next recipient or not.

A page icon indicates that the quick step will not automatically move the workflow.


A page icon with a tick indicates that the quick step will move the workflow to the next recipient (or finish the workflow, if there are no other recipients in line).


There are also a set of quick steps that CC or forward a workflow to another user without completing any action appended. These quick steps have an arrow icon.

Note: Comments need to be added before actions, and multiple actions cannot be added to a single quick step.

Mini-ToC Proxy:

Topic Toolbar Proxy:

of

OutPut ToC Proxy:

Menu Proxy: